upcycled clothing
Showing posts with label upcycled clothing. Show all posts

Refashion | DIY French-Knotted Upcycled Cardigan


thee Inspiration:


I had been collecting and using thrifted embroidery hoops for years now. Not to sew on or with but as wall decor above my sewing space. Along with the hoops one day I found a bag of brightly colored doilies so I put them together on display. I also found some interesting frames I then turned into another decor piece featuring used measuring tapes (DIY post about it here) and two pin cushions. 


A few years back I got an embroidery thread set from an aunt as a gift and since then it piqued my interest to actually try embroidering by hand. I learned some stitches by watching tutorials on youtube. I bought more thread and I embellished this upcycled denim crossbody bag with it:


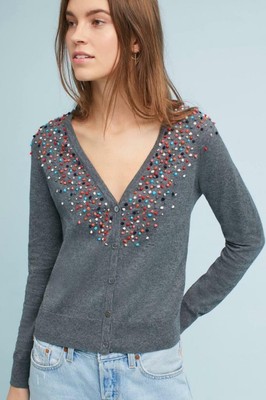
Then I saw that grey cardigan from Anthropologie and I thought to myself, it is completely doable. I had this fuchsia cardigan I've worn a couple times. It's not a V-neck but it's plain and could certainly use a little revitalization. The French knot confetti embellishment is perfect.


If you don't know how to make French Knots, check out this video I watched to learn how to make them (they are super simple!): How to Sew a French Knot Stitch by Professor Pincushion

Initially I thought I would be using an embroidery hoop to keep the cardigan nicely stretched but I ended up not really needing it. I guess I should've just used a much smaller hoop instead. It would've helped but I think it turned out fine, you might not need it. This is what I ended up with so far. It's definitely not as full as the Anthro cardi but I can always add onto it. If you have a plain cardigan in need of some flair, just add sprinkles!


☮♥♻

New in thee Shop: Upcycled Jean Patchwork Short Sleeve Top


In its past life: remnants of jeans and cotton.

Found new life as: A unique upcycled patchwork jean top! All seam inside are serged. There is a snap closure on the top middle back. There are 2.5" side slits on the bottom hem. (I used Simplicity pattern 8602 for the fit).


Size: US Medium (please refer to measurements)

*Photographed on a size US womens 6/8 mannequin for reference

Width from underarm to underarm (chest) lying flat across front: 20"

Length from shoulder to hem: ~21"

Sleeve length about: 8.5"

Check it out in thee shop here.

☮♥♻

Upcycled Baby / Toddler Clothing Ideas


I posted this awhile back to my IG. I have a new #workinprogress lol due in October. I made him this onesie with one of my husband’s old button down shirts and used this sewing pattern by Hello Dear Kids in size 6-12 months. The pattern comes in four styles with this being the elastic long romper. I didn't have to make the button placket since the shirt already had it done. I did have to add a metal sew on snap though because it got too thick for a plastic kam snap. This pattern really lends itself to upcycling shirts with buttons. There are tons of upcycled clothing ideas for kids and I can't wait to try more. Here are some on my list:

1. Upcycle a T-Shirt into Baby Leggings by Heather Handmade


5.  DIY Baby Beanie Hats from Tshirts by You Make It Simple

6. Recycled Cashmere Baby Booties by Alaska Knit Nat

7. Knit Baby Baseball Hat by Sewing Rabbit

8. Upcycle Baby Clothes into Bibs by Scratch and Stitch

9. Baby Romper Pattern from a Tshirt by Heather Handmade

10. Upcycled Baby Shorts and Bloomers by Sew Modern Kids

☮♥♻

New in thee shop: Upcycled Jeans Patchwork Sweatshirt and Bucket Hat Set


Upcycled jeans patchwork sweatshirt and matching bucket hat.


      This sweatshirt was something I hadn't made before. I used Simplicity pattern R11066, a combo of styles a & b, size Medium. For the patchwork I used a melody of gray, black and blue jeans. Some patches have a raw frayed edges on top but inside all seams are completely serged. The kangaroo pocket is a an overall bib that gave the sweatshirt a total of three pockets. I still had some smaller leftover pieces of denim at the end so I made a simple (non-reversible) bucket hat with a matching patchwork. So they could be worn as a set.

You can find this upcycled jean sweatshirt here.
&
Bucket hat here.

☮♥♻

Refashion | Mad for Plaid - Upcycled Faux Layered Tunic 2 in 1 Top


thee Inspiration:


How cute is this? Two shirts in one! or so it seems. Perfect for fall/winter! It looks upcycled too but these are not :/ These were selling on Zulily a while back. They caught my attention because they really do look like they could be upcycled. So it prompted me to want to make/upcycle my own. Of course I'm not the first to do this, here's a cute refashion by Chapter 37, where she added the button down's collar too.


One great thing about doing this is it's pretty easy since the main parts are already done for you.


I found this short sleeve knit top at the Goodwill along with the mens plaid button down. I really wanted a long sleeve sweater but didn't find any. This top is nice though, like new but dated so I think adding the plaid definitely spruced it up.

You want to cut however much you want of the bottom end of the plaid button down. Then of the knit top, cut the sides starting 2" down from the underarm. Serge the plaid pieces across the tops. Pin the plaid underneath the knit top, to both front and back.

Top stitch to sew the plaid in place with the knit top. Then serge the sides, front and back.

Next take the plaid shirt remnant use the back or sleeves if they're wide/long enough. This or these will be your side inserts. Make them however wide for whatever amount of volume you want added. Pin them into place, right sides together.

I left the inserts about a quarter inch longer than the side lengths so that when I hemmed it up, it would line up with the already done hem.

So you have it all pinned you sew it up. Make sure the tip of the triangle insert is sealed. Voilà, godets! Or really mine turned out looking more like inverted pleats but that's okay.

Lastly, hem the bottoms of the added plaid to align with the already done hem. I also added a second button to the bottom opening of the plaid. I thought it needed it.

It's quite the comfy top!


This is another one I did for my mom. Isn't a lovely marriage? It's basically the same process. Except this one actually has longer sleeves so I was able to add the cuffs.

You cut the bottom of the button down shirt and the sleeve cuffs, leaving about a half inch above the actual cuff. Then serge the raw edges of all pieces.

Then you pin it all in place. The cuffs go inside the sleeve so they fold out, if that makes sense. Sew it all up and your done.

I gave this one a little plaid detail on the top since it has a collar. It helps tie it all together too. So there you have it, a simple refashion, perfectly seasonal. I hope you give it a try!

☮♥♻


New in thee shop: Upcycled Denim Patchwork Jean Jacket Kimono Duster


Something new, something all blue! I wanted to make something different and came across this pattern for a patchwork / color block kimono style jacket. I thought it would be a perfect base with standard sizing. I made a medium size with about a 44" width (it's supposed to be a loose fit).

McCall's 7132 MISSES' JACKET

Of course I added more patchwork to it though and created this one of a kind piece. I used lighter weight denim and denim-look materials like lyocell and tencel. It is like an open front cardigan so no closures of any kind. There is a pocket on the right side and the whole thing is unlined to keep it from being heavy.

You can find this jacket in the shop here.

☮♥♻

DIY Upcycled Clothing Fabric Planter Pot Cover


I took an old top which I loved the print of but the tunic itself not so much anymore and some remnants of dark jeans. The material of the top is actually quite silky and alone wouldn't lend itself for this project but since I paired it with the denim it's all good. If you plan on using thin materials for both sides I suggest adding interfacing to stabilize it.


You use a plate to trace a circle for the bottom base and then a long strip of material for the sides. Cut two of each to make the pot cover reversible and fold down the top edge to see both materials. 


These pot covers are perfect for covering up plastic nursery pots that most plants come in. Just it pop out for watering so you don't get the fabric wet and place it back in when it's all good. Or if you want you can use waterproof fabric for one side of it.


P.S. peep my little faux succulent in the picture above. I re-used a Oui by Yoplait yogurt cup. They are glass and excellent to reuse as mini pots (or little containers, just buy some silicone lids). I added some small pebbles to keep the plant in place and complete the look.


For complete in depth instructions you can follow this tutorial by Mood Fabrics. "These easy fabric planters go together in a snap, with no pattern needed! Just grab your plants and a pen".


☮♥♻

Refashion | Men’s Button Up Shirt into an Off Shoulder Top


Thee inspiration: An off shoulder striped cotton top with 3/4 sleeves, buttons down the front and a drawstring tie waist.


I found this shirt off Ebay. I tried looking in store at the local thrift but didn't have any luck finding a big mens white cotton striped button down shirt. Since I was being pretty specific with what I wanted Ebay made it much easier to find it with all their filters. I actually really like this material, the detail is cute and it was in EUC. A great match.


First I grabbed a shirt I already had, not off shoulder but I like it's sleeve length so I used it for that. I also referenced the sleeve width for the elastic hem.


Then for the neckline, I pinned it while wearing it to the desired depth. Cut it straight across after.


I serged all the raw edges i.e. the sleeve hems, the shirt's top and bottom. Then sewed the edges back a half inch or so to create casings for the elastic and drawstring.


I'm pretty sure there's tools for this but I attach a safety pin to lead my elastic through the casing.

Then pull it all the way around and back out. You sew the elastic in place. I didn't sew the shirt closed down the button placket but you can if you want. I only sewed it down together at the top and bottom for the casings.


From the leftover material I was able to make a thin cord to use as a drawstring for the waist. The elastic across the shoulders doesn't start until about 3" away from the button placket on both sides so the top lays flat for most of the front.


Really all your basically doing is creating casings on a shirt that is bigger than your usual size. Casings for the elastics, across the shoulders and sleeve cuffs, around the waist for the drawstring. You could actually use elastic in that casing as well if you don't have enough leftover material for a drawstring or don't want that in particular. All of these casings allow for the top to adjust to your size while keeping a boxy loose fit.


☮♥♻