google.com, pub-3532400279370354, DIRECT, f08c47fec0942fa0

thee Kiss of Life Upcycling: Tutorials
Tutorials
Showing posts with label Tutorials. Show all posts

DIY Burlap Fabric Pumpkins


These fabric pumpkins turned out so cute. I found the perfect sized pumpkins by The Spruce. You can get their free sewing pattern here. They have it titled as pumpkin pillows but if you just follow their tutorial for the body, you can add whatever type of stem you'd like and use whatever kind of fabric. I wasn't looking for pillows, more like just for decor but again the sizing of these worked out great. I took the large pumpkin pattern and scaled it up about two sizes more to make the really big pumpkin.


I also found this tutorial for upcycled pumpkins. If I didn't have so much of this fabric already I would've definitely done this one. You can check out the how-to by Evie Bidell, here.


I have had this orange burlap material for years and it never occurred to me that it would be great for some fake pumpkins. It would be good for some fake carrots too but those don't really say fall as much as they do Easter. Anyway there is so much of this material that I was tempted to make huge pumpkins but then I wasn't sure where I would put them since I don't want them outside.


This craft also allowed me to make use of some fabric samples that were from a company I no longer order fabrics from. I took all the green shaded taffeta swatches and some crepe satin but only ended up using the taffeta. Taffeta is awesome to work with because it's stiff, lightweight and you can easily singe the edges. It's basically the paper of fabrics.


For the trunks or stems rather, I got a roll of faux burlap ribbon. I knew I only needed small pieces so I went with the ribbon instead of buying fabric. Added bonus the ribbon has sealed edges making it even easier to work with.


I sort of followed the given pattern for the stems but not really because mine are not as curved nor as tall. I gave them a little stuffing too. For the pumpkin leaves I cut away the pieces of swatches that had glue residue from the booklet they were in and cut out some pumpkiny looking leaves. 


Then I singed the edges of the leaves with a candle and hot glued a little pleat on them. Also hot glued some of the stem edges inward to create a flatter base.


First I glued on the leaves then the stem on top. I added some bows made out of twine for added decoration. It's not much but looks cute all together.


So fabric pumpkins are pretty easy to make whether you sew or not, there are plenty of tutorials out there showing you different methods to get it done. (Just search "no sew fabric pumpkins" on google or Pinterest) Real pumpkins are nice but they are one time deal, they're a fruit (yes, technically because it has seeds) and are better cooked up and eaten than wasted. Make these pumpkins and you can re-use them every autumn. 


Here they are sitting on the piano. The middle pumpkin is almost too big for this spot but I like how they look all lined up. I'm thinking some wooden letters or signs would accompany them really nicely. Maybe like the words "give thanks" or even "fall" would work. I hope you give making your own reusable pumpkin decor a try. 

☮♥♻


Refashion | DIY Fabric Cuff Thermal Top à la Free People


What an embellishment. Take a simple cozy top and give that extra pizazz with a lovely piece of fabric. To think waffle knit thermal tops use to just be undergarments or sleepwear.


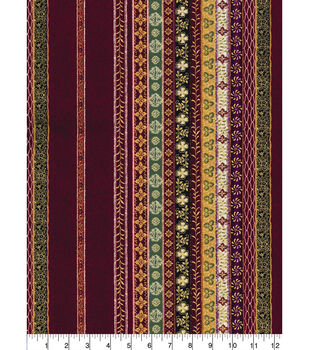
I had been wanting to do this and when I saw this fabric at Joann, I thought it would be perfect. Instead of patchworking fabrics yourself, you can use this fabric and achieve the same result with less work. The fabric is cotton with a metallic print that looks sort of like it's embroidered trims put together.

Asian Inspired Cotton Fabric 44"-Mini Asian Floral Stripe Met

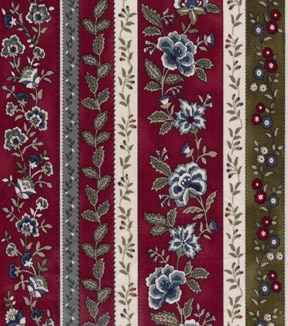
I think this one would totally work too. Especially with some added cotton lace trim.
Vintage Cotton Fabric 43''-Jacobean Stripe on Red

So the way I added the fabric to the sleeve is in my opinion, the most effective. You end up with no raw edges needing serged or anything like that, it's great. I had only serged the edges of the striped fabric because initially I wasn't sure how I was going to do it. I measured the width of my arm, top and bottom of where the fabric cuff would go. Sewed it together to create both cuffs.


First you mark how long of an opening you'd like. I know it looks crooked but I made it parallel to the side seam. Pin in place.


You want to sew around your marking about quarter inch wide. I have three seams because it was too skinny of an opening at first. Also sew around the cuff end joining the sleeve and fabric.


Then you cut in between your opening seams. Clip a v shape at the end or beginning however you look at it (on the left in the photo).


Flip the fabric right side out over the sleeve and pin into place to get rid of the raw edge.


You end up with these hoof looking things lol.


I chose mismatched buttons and used a loop trim that I simply sewed to the underside of one side of the opening.


Lastly I decided to add a metallic trim to top edge because I didn't like how it looked. I suppose it was fine really but yeah. It was the only trim I found in store that followed the color scheme the most.


I would've liked all brass buttons but these are what I had. Maybe I'll change them later on whenever I get some. I definitely want to do this again to another top though. Hope you try it too.

☮♥♻


DIY Sewing Pattern from Your Own Clothes | TUTORIAL

Slow Fashion. Have you heard of it? It's the ethical response to fast fashion.

"It's about understanding the process or the origins of how things are made," says Soraya Darabi, co-founder of the clothing line Zady. (npr.org)

"It represents all things “eco”, “ethical” and “green” in one unified movement. It encourages taking time to ensure quality production, to give value to the product, and contemplate the connection with the environment." (notjustalabel.com)

It's like fast food vs slow food and we all know one way to avoid fast food is to cook the food ourselves. So why not make the clothing ourselves? There are plenty of sewing patterns out there. Even free ones online but you don't really know what the fit will be until you make it.

You already know how your own clothes fit you though. So why not use them as your patterns? Because you you're not sure how? Well let me give you an idea by showing you how I made a copy of this simple dress I really like. The concept can pretty much be applied to any article of clothing.


I re-use packaging paper to draft patterns on. It works great, just iron out the crinkled ones. This dress is 5 pieces. A front bodice, back bodice, skirt and pair of sleeves. Starting with the top I took the widest measurement first so I would know how wide I need the sheet of paper. The widest would be the bust width then waist width, also get the longest vertical length.

Remember to include a seam allowance. I wanted this new dress to be slightly looser so I gave it another inch. A big bonus to making your own clothes is the personalized alterations you can make.

I bought 2 yards of this colorful rayon and it was more than enough. Take the same measurements for the back piece. Once you work out how big the pieces of paper you need, fold them in half. Also fold your dress in half. Starting with the front place your paper over it, aligning the folds and end. Then trace over the edge of the neckline and armhole. 

Do the same thing to the back pieces and also for the sleeves. These sleeves are slightly gathered at the tops. I took that into account and made them a little longer then the tracing would make it appear. They also have elastic in them so I took down the measurement for the length of elastic I would need too.

I think the skirt is the easiest to alter, if you want to. Add width if you want it more full. If you want it longer or shorter, add or take away. Add pockets if it doesn't have any. I wanted the dress slightly shorter, also like an inch. For the skirt part though, I don't think it's necessary to make a pattern. Many a time, your skirt width will be the fabric width. In my case it was. It worked out perfectly.

Jot down your skirt details (and any other notes) on one of the pattern pieces for the top. Since my fabric has these square patch like things going on, I wanted one centered on the front. So I unfolded the front piece and set it in place where I wanted it.

There was enough space to cut out the sleeves along side the front piece so I did that. I was able to place the second sleeve over a similar patch design so that they would match a bit.

I cut out the back in two halves because it fit better on the fabric this way. So I gave the center a seam allowance to sew it together.

Took the back pieces and sewed them together to create one then attached the front to back at the shoulders.

Then I serged those shoulder seams, the center back and the ends on the sleeves.

I created a casing for the elastic in the sleeves. Gathered the top of the sleeves a bit. Then sewed them onto the bodice. This way I could sew the sides from sleeves to end of bodice all in one seam. Alternatively, you could sew the sleeves lengthwise and sew the bodice at the sides then attach the sleeves to the bodice at the armholes. Doing it this way actually creates a nicer end to the sleeves since the serged edge would end up tucked away in the casing but I forgot this. It's okay though, either way gets the job done.

The skirt took one seam and I placed it on one side. I gathered the top of that piece to fit in with the bodice width. I sewed them together and serged the raw edges together. Then I hemmed it. To finish the top neckline I created a bias tape out of the same fabric.

Lastly, I added a tiny piece of elastic and a tiny black button to close the key hole on the top back of the dress.

This was the initial, final result that I was not 100% content with. The pattern on the skirt conflicted with the top (the big squares with the light blue centers). I really didn't like that and wished I had paid attention to it before sewing it on this way but thank goodness for seam rippers.

I also thought it lacked a little something and added black cotton lace trim to the waistline.


So, I hope you give making pieces for your wardrobe a try. The feeling of accomplishment whilst you wear the thing is pretty awesome. #memadewardrobe
☮♥♻

DIY EASY UPCYCLING | Upcycled Measuring Tape Sewing Room Wall Decor


This upcycling craft is for all my fellow seamstresses out there, to spruce up your sewing space. I hope you save your old measuring tapes because you're going to need a couple.

You'll also need:

  • A frame
  • A piece of card stock that fits your frame
  • Scissors
  • Hot glue gun or super glue


All you're doing is arranging the measuring tapes on the card stock in any way you want. I happened to have this frame I found at the thrift store, with a neat oval plastic mat (I spray painted it red). Other shapes would be really cute too, like a heart.


I used the oval mat as a stencil on the paper, cut the measuring tapes (3 of them) to fit and glued them horizontally in a repeating pattern. Once it was done, then just placed it in the frame.


If you don't want to make wall decor, consider one of these measuring tape upcycling ideas: