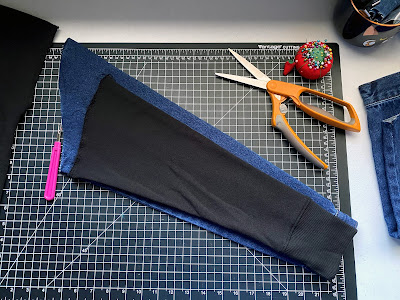
google.com, pub-3532400279370354, DIRECT, f08c47fec0942fa0

Vintage Finds | Simplicity 5082 Sewing Pattern from 1972 "Super Jiffy Wrap and Tie Pantskirt"

So I think I nailed it.

A while ago, I posted this picture to my Instagram. I was excited because I had found a wide leg pants design I liked for this vintage floral fabric. The excitement didn't last. According to the pattern, I don't have enough fabric. You need like 4 yards and then some. I sincerely thought I had a lot of that floral but it's only enough for like three leg parts. Sure, I could make the shorts version but I was really set on the pants.

Anyway at the same time I bought that pattern, a vintage pantskirt kept popping up in my search. It looked pretty cool. The best of both worlds. It looked really easy too and I was tempted to just make it by observing the picture provided on the pattern envelope. I went ahead and bought it though from While The Cat Naps, an Etsy seller of vintage and modern patterns.

How to put it on is quite the interesting process. Sucks having to use the bathroom though. Like a jumpsuit or romper you basically have to take it all off.

I got 3 yards of this printed rayon fabric.

I don't think it gets any easier than this.


It's pants inside a skirt. Super Jiffy Wrap and Tie Pantskirt! Definitely give it a try if you're a novice sewist.

New in thee Shop: Upcycled Jeans Woven Lattice Patchwork Bucket Hat


In its past life: remnants of jeans

Found new life as: An Eco-friendly upcycled denim bucket hat!

This hat is a patchwork made with various upcycled jeans. Can be reversible if you want with a simple light blue solid denim look cotton on the other side. One size will fit most.

You can find it in thee shop here: Upcycled Handmade Bucket Hat

☮♥♻

Refashion | An Old T-Shirt + Scrap Piece of Fabric


thee inspiration:


Giving color and pattern to a solid comfy t-shirt, looks simple enough to me. I had this bright red-orange tee and a remnant of fabric leftover from this wrap and tie pantskirt I made. This fabric piece just goes so well with the shirt. It was meant to be.

First I did was mark how high I wanted the center back. I basically made go to where the front neckline is. Then fold the shirt in half, with side seams meeting in the middle. Create the shape you want for the front and back "v"s. Well I guess the back is more curved than a "v" but you get it. I had the front "v" end right above the belly button.

Once that was cut out (leaving a 1/4" seam allowance) I took my scrap piece of fabric, evened it out and sewed it in half lengthwise. The piece was 37.5" long by 30" wide so 15" when folded in half.

I have a similar shirt that I like the back length of so I used it as a reference. Within this piece of fabric I was able to get both front and back pieces. Starting with the top back curve.

Then the front after the back is all cut out. Make sure the width is the same as where it meets up on the sides. After that I had it flare out some since this fabric doesn't stretch like the t-shirt does.

So the seams on the fabric will end up in the middle and should then be sewed to your t-shirt. I did the front first then the back.

I wanted the front middle corner to line up exactly with the middle seam of the fabric. It was a little tricky but got it eventually.

After the front is attached to the front and the back to back you can serge the raw edges. Then you can attach the sides together and serge those. After all that even out the bottom a bit, get it how you want and hem it.
All done!

Renew & reuse!

☮♥♻