DIY Fabric Tags / Labels for Your Sewing Projects | TUTORIAL


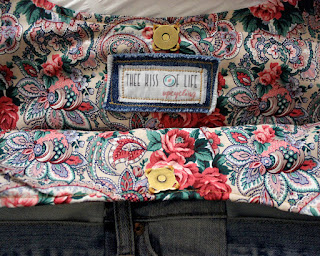
I back my cotton fabric labels with denim to help stabilize them

I thought I would share how I make my fabric tags for my purses. The way I used to make them using iron-on transfer paper and ribbon.


They were kind of cute because the way I sewed the ribbon back sometimes made it look like a little scroll banner and not to mention I always have ribbon of some sort on hand. Although, I always hated how you could see the white of the negative space around the logo and words.

Also iron-on transfer paper isn't very permanent, it's good for a while but it wrinkles and fades away eventually. So I looked for an improved way to do this and came across this ingenious idea. I looked to different tutorials and now this is basically what I do:
  1. You will need freezer paper, a piece of fabric (thin fabric is best, like a lightweight cotton), a piece of regular paper that fits through your printer well (for me it's an 8.5" x 11"), scissors (or rotary cutter and board, if you have that and want to be more precise), iron, computer and printer.

  2. Take your fabric and iron it out if it's not already pressed.

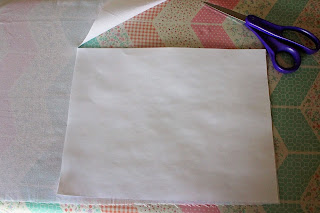
  3. Take your sheet of paper and use it as a stencil to cut out your fabric into that shape/size. This is when you could just use the measurements of the paper and use your rotary cutter with board or like quilter's cutting tools for precision.

  4. Place your fabric under the freezer paper, with the shiny side touching the wrong side of the fabric. Iron on a low-medium setting. Don't make it too hot or you'll cause too many wrinkles and/or bubbles. You want to keep the sheets as flat as possible but you also want the freezer paper to stick to the fabric.

  5. I use Adobe Illustrator for this but use whatever program you like. I open my tag design (in CMYK color mode) onto an art board of the same size as the fabric/freezer paper sheet. I space out copies of the design giving them some room around each other for when I go to sew them, the seams won't interfere with anything. As you can see I encircled the design with a gray border to give a better visual of space needed. I later delete it so it won't print. You could leave it though so you know exactly where to cut if you're cutting them out individually.

  6. Fill your page with as many tags as possible. I use Ctrl+Shift+M, that gives you a Copy button that you'll want to click, third from top. Use it once. Then Ctrl+D will repeat the last transform. Now you're ready to print. In your printer settings just let it know your using some other specialty paper.

  7. Your page should print nicely. If some tags have ink smears, it was likely because the sheets weren't flat enough for the printer but that's okay you can discard those pieces.


  8. Cut out your tags before peeling away the freezer paper. I think it's easier that way but it's up to you. That's it, now you have tags/labels you can use for all your sewing projects. You can pretty much use this process for any design you'd like printed onto a piece of fabric. This process definitely beats iron-on transfer paper, it looks that much better and professional. If you want to save your ink though you could just have a custom fabric made with your tag design repeated on it. Check out sites like Spoonflower and Modern Yardage. They print your custom designs onto fabrics of your choice. Or of course just have custom labels made...that's obviously the most professional thing you can do. I think though if you have everything on hand to make these yourself it's pretty affordable and a great solution especially if you're just starting out with your handmade biz.


DIY EASY UPCYCLING | Tinted Glass Jars & Bottles

I've basically been hoarding all glass containers like juice bottles and jam/sauce jars lately. Refusing to recycle them because they're so good to keep. Store other foods, store other stuffs. Why get rid of these? Upcycle, c'mon now, let's do that instead!

Here I tried to tint some of my glass jars...


I did something wrong though so there's no finished product picture because they did not turn out how I hoped and I gave up. I didn't really follow anyone's directions or instructions, (thought it was self explanatory, modge podge, food color, stain then oven or maybe it was overconfidence I had seen it on Pinterest a million times) of course now I wish I had done it right. Like this:

Color Tinted Glass Jars, a tutorial by Fancy That Design House

The transformation is awesome. Look at that glass. So vintage, super cool!

So maybe I'll try again. I mean doesn't this just inspire you?

Subtle beauty!

P.S. Here's a really good tutorial for getting sticker/glue residue off glass:

The No Sweat, Chemical-Free way to Remove Labels and Glue Residue from Your Jars by The Creek Line House

Furniture Makeover | Upcycled Vintage Sewing Table


My mom bought this sewing table at a yard sale many years ago. She tried to re-finish the wood and added a dark cherry varnish but it was not done right. She gave the table to me in dire need of a makeover.

So I sanded it, which took forever. The coat of varnish was not an even coat and underneath that was the original finish that had to go as well. I painted the table with Rust-Oleum Spray Paint in Satin Ivory Silk and the drawer handles with Rust-Oleum Spray Paint in Gloss Black.

Originally I wanted to go bold and paint it all red but I changed my mind because I thought pairing the cream and black would look more classic.

This sewing table isn't really used like it should be because I also put my laptop on it and my sewing machine isn't the right kind to be placed inside the designated compartment. It's a really good table regardless and I intend to use it however I can.


20 Cool Ways to Upcycle Plastic Toys

1. Upcycled Plastic Toy Animals Bowl

2. Make a Stylish Toy Animal Necklace

3. Animal Toy Scluptures like this life-size dog by Robert Bradford

4. DIY Plastic Toy Animal Pin Cushion

5. Make Wall Hooks / Jewelry Knobs

6. DIY Animal Corn on the Cob Holders

7. Animal Topped Jars

8. Upcycled Dinosaur Toy Planters

9. Make Sparkly, Glittery Animal Christmas Ornaments

10. Use Plastic Toys, Jumbled Together, Spray Painted to Decorate a Frame

11.Toy Animal Bookends

12. Turn Toy Dinosaurs into Toothbrush Holders

13. A Toy Lamp made of recycled Toys by Ryan McElhinney

14. Toy Animal Magnets

15. DIY Toy Dinosaur Candle Holders

16. Party Cups with Animal Handles Tutorial

17. DIY Plastic Toy Animal Ring Holders

18. DIY Dinosaur Serving Dish

19. Plastic Toy Animal Gauge Earrings

20. DIY Stir Sticks

DIY EASY UPCYCLING | Thumbtack Crafts

Thumbtacks are now basically being used like studs for things other than clothing. I mean I can't imagine anyone would want to thumbtack clothing...I mean ouch...unless of course you just bend the one prong but it probably won't stay in place and even if it does it's a thick prong...oh man, just get actual studs for clothes, okay? Alright. Anyway if you have a surplus of old thumbtacks here are some things you can do to make use of them.

1. Thumbtack Globe

2. Mirror Accents

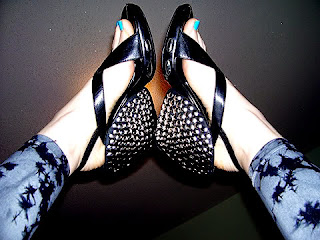
3. Tacky Shoes

4. Thumbtacks on Styrofoam, Letter Art

5. Flower Wall Art

6. Thumbtack Headboard

7. Thumbtack Word Art

8. Cleverly hide the exterior of old ugly Candles

9. Thumbtack Pumpkins Decor

10. Vase Filler Balls

Oh okay, vase filler balls. Yeah...I had no idea what to call them. That's kind of what I have going on right now though. I re-used some styrofoam balls that had been a mobile planetary system (Do you remember making that for science class? My favorite planet to paint was the Earth). I'm digging the apothecary jar but I don't have one and that's not what I initially had in mind for these. I'll get back to you when I test out what I want to do with them. For now they will sit here waiting in their metallic glory until I get the rest of supplies.

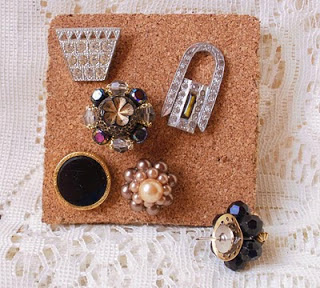
P.S. You can also continue using thumbtacks as thumbtacks, just spruce them up...

As Cute as a Button


Gitzy Glitter

Washi Tape does wonders

Vintage Brooches = Glamorous Thumbtacks

P.P.S. There is a difference between thumbtacks and push pins. In this post I'm talking about thumbtacks because...

A thumbtack is a tack with a large flat metal head used to fasten documents to a wall or board. As their name implies, thumbtacks can be pressed into place by hand. Push pins serve the same purpose, but because they have longer, spool-shaped plastic handles, they are easier to insert and remove. This shape also makes them somewhat safer, since they tend not to settle on horizontal surfaces with their pins facing up, as thumbtacks do.

Thank you Knewance for clearing that up!